
How to clean a pull down kitchen faucet spray head? To clean a pull-down kitchen faucet spray head, you will need only two things. Vinegar and water.
Just add vinegar with an equal amount of water in a small bowl and put your faucet’s spray head into it. Then let the spray head soak the solution for some hours, or maybe overnight. Then take the spray head wash it with clean water and put it back into its place.
However, it’s not only about cleaning. You will have to take the aerator out, clean that aerator, then clean the spray head. Besides, there is a possibility for dirt being left in the pipes which requires an additional step for cleaning.
Don’t worry, the steps are not as hard as they seem unless you go through this article. Here, we will discuss everything about the cleaning procedures of a kitchen faucet spray head. Let’s not beat around the bush anymore and get to the topic straight.
Keep reading!
How To Clean A Pull Down Kitchen Faucet Spray Head?
Here are some quick steps below that will tell you how to clean a pull down kitchen faucet spray head. Have a look below:
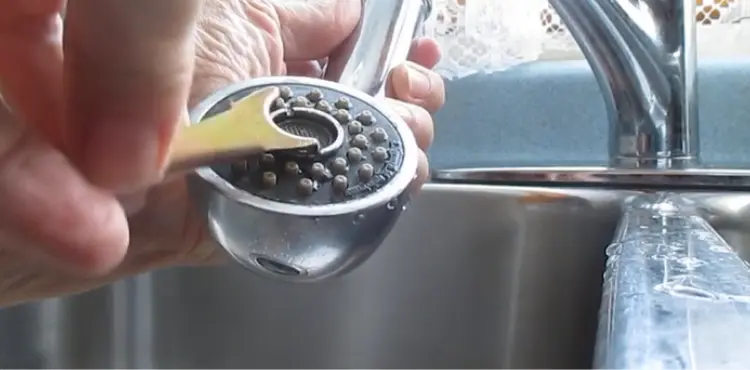
Aerator:
All conventional kitchen faucets have a little screen on the spout, called an aerator. It is also known as a hose connector. Its main task is to infuse water and then convert it into small streamlets.
You can see this aerator on spray heads as well. Some faucets have their aerators installed in the middle of the hose and spray head. Whereas, some faucets have their aerator installed on their face.
Removing The Aerator:
To clean the spray head, you have to first remove the aerator. It should be located at the base of the pull-down spray head.
You just need to pull out that spray head and hose. Afterward, use a clothespin or clamp to block the hose. As a result, it won’t retract.
Some particular faucets come with aerator keys. You can use them to take out the aerator. If your faucet doesn’t have that, you can simply opt for an Allen key or a flathead screwdriver.
Now, take the spray head out by unscrewing it and place the aerator on that spray head. Try putting the key between the grooves of the aerator and turning it clockwise. Then pry out the aerator with a flathead screwdriver or the same key.
Cleaning The Aerator:
Look for any dirt or mineral sediment in the aerator that is located under the faucet. If you find so, rinse them off. You can use a toothbrush or sponge for it.
Well, a toothbrush can help you to clean all those hard-to-reach areas. After you are done cleaning, place the aerator back on the spray head.
Cleaning The Spray Head:
Sometimes, cleaning only the aerator gets our job done if the spray head has been placed newly. But if the spray head also requires a cleaning step, you can’t avoid it.
When you take the spray head out from your faucet, you will see it untwist the hose. Thus, there becomes a great possibility for the hose to retract. Don’t worry, you can prevent your hose from retracting by using a clamp or clothespin as said before.
Cleaning a spray head is very easy. You have to first take a bowl and put some white distilled vinegar into it. Then dip the spray head into that distilled vinegar and let it submerge overnight.
The next morning, you will see the spray head is soaked completely. Now, you can rinse it with clean water and connect it to the faucet again.
Check After Cleaning:
Your task doesn’t end here. There is yet to check the faucet for the flow of water. Because most of the time the water flow tends to be weak after cleaning the spray head.
To check that, you have to unscrew the spray head. If you see the water inside is not consistent and steady, it means deeper down the pipes are having some dirt.
Also, the ends of the hose are made of plastic which is a reason for mineral build-ups. You can clean them with distilled vinegar.
Cleaning The Hose Fitting:
To clean the hose fitting, you have to find out the faucet body. For this, you have to go beneath the sink where you will get the cabinet housing.
You can use a flashlight to inspect where the hose emerges from the spout tube. After you find the body, squeeze the tabs and hold them in place. Don’t forget to pull them apart.
Now take some pliers and unscrew the fittings of the spray hose. Soak the fittings in the distilled vinegar just like you did for your spray head. Afterward, rinse them with clean water and put them back into their place.
Frequently Asked Questions
How Do You Clean A Pull Down Kitchen Faucet Head?
To clean a pull-down kitchen faucet head, you have to take a bowl filled with water and vinegar in the same ratio. Then submerge the head of your kitchen faucet into that bowl and cover it.
Let the head soak for some hours or overnight. After taking the head out from the bowl, rinse it thoroughly to make it free from gunk.
How Do You Clean A Moen Pull Down Kitchen Faucet Spray Head?
Cleaning a Moen pull-down kitchen faucet spray head is also simple. You have to mix the chemicals and water first. Then unthread the faucet head from the pull-down faucet and clean the screen with a tool pick.
Next, place the screen in a solution of CLR and water. Now, remove the excess debris from the screen and replace the plastic screen and O-rings.
How To Remove The Spray Head From Delta Kitchen Faucet?
On some faucets, you can just remove the spray wand by simply unscrewing it. But on a Delta faucet, you will have a tab that you will need to push in and then spin off.
Firstly, you will have to lose the knot and detach the spray wand. Then soak it in a small cup of white vinegar for 30 minutes. Once the gunk is gone, give it a quick rinse.
How To Clean The Kitchen Faucet Head Without Vinegar?
Instead of vinegar, you can use baking soda to clean your kitchen faucet. Make a baking soda paste as a DIY cleaning solution.
Take a small bowl, pour some water into it, and add ½ cup of baking soda. Then apply the plaster over the shower head and leave it for 25 to 30 minutes. Then wipe out the paste with a simple microfibre cloth.
How To Clean A Non-Removable Faucet Aerator?
First, place a towel or rag over the faucet cap or cover it with a little masking cap. Then use a wrench or pliers and turn the cap counterclockwise until it separates from the faucet. And then take the cap off.
In the next step, you will have to clean the screens and water restrictors by flushing them with water. Use a tiny brush to clean the tiny pores. Lastly, reassemble the aerator.
Final Thoughts
So this was all about the cleaning procedures for a pull-down kitchen faucet spray head. As said before, you will just need distilled white vinegar and water.
Don’t think that the cleaning process is possible only with vinegar. If you don’t have vinegar in your house, you can use baking soda too.
It works like a superb cleaning agent. Just make a paste of baking soda by mixing it with water in equal amounts. Then apply that paste over the spray head and leave it for 30 minutes. Afterward, rinse the spray head with water and wipe it off.
Hopefully, the above concept could give you an oriented distinction about the cleaning techniques of the pull-down kitchen faucet spray head. Let us know through the comment section below if you have any queries.
Thank you.

Hi, this is Sondip. In my opinion, the best approach to making the most of your home is to clean it, decorate it, and organize it. You should feel most at ease in your own home.
If you considering changing your faucets or wanting to repair the ones you already have could find my enthusiasm and my ideas to be of enormous help. My aim is to assist you in selecting the ideal faucet, and accessories for your residence and ensure that they are compatible with your sink and worktops.